Many years ago my wife and I invested in a nondescript color inkjet printer, one that did border-less photos and had a good feature set. The thinking was to print out photos and do a bit of scrap-booking. Well, time and a shift to a digital lifestyle mostly killed that dream, however the printer still gets a fair amount of use as my role-playing prop-maker!
The 4×6 photo size–and 5×7 to a lesser extent–is nearly the perfect size for handouts. It’s roughly the size of an index card but you can print anything you want on it! As a player I’m hooked to these things, making my own player aides. In D&D 4E a 4×6 card cut in half could be used to make your own customized Power Cards, long before Wizards jumped on board that bandwagon themselves.
As a GM I use them voraciously, as either handouts or to hold NPC data points. Plus I just can’t help myself and poke around in InDesign or Photoshop and turn what could be a bland experience into one with a bit more graphical punch. Sadly, I didn’t have time to dig through my archives for some good examples when preparing this article; my only two samples are not my best work, one of which is a player aide.
 For example, in Star Trek the totally awesome starship construction and combat system–that I may or may not have written, ahem–lends itself really well to Maneuver Cards. Slot a maneuver on a 4×6 card and since maneuvers can chain into one-another, interlock them like puzzle pieces, building your own “maneuver flowchart” for the round, as a matter of example.
In a Stargate SG-4 game, “The Working Hour,” there was the vehicle of a repeating time loop. My 4×6 cards came to the rescue for player handouts allowing them to bypass NPCs and “claim” objectives. The intent being, once you’ve successfully convinced General Hammond that you’re caught in a time loop–having role-played the conversation once–we then have a prop to indicate that in the future you don’t have to do that task again.
 In D&D the prop cards reared their head again as consumable items (resources) that the party could use as part of a research mini-game. Convert an NPC to your cause and then use them as a renewable or single-use resource to achieve a bonus towards the story objective which had a hard timeline associated with it.
If possible I recommend getting matte photo cards. They’re a bit harder to find but the typical gloss versions have their obvious drawbacks. Plus the matte ones are easier to write on and erase if the card is used to track a mechanic of some kind. Because of their ease of making, I consider these cards disposable; I’ll routinely make a new player card for each session.
Preferably your printer can handle border-less printing. It’s not a deal-breaker if it can’t, it just limits the amount of printable area you’ll have available to you.
Finally, ink. Inkjet ink can smear if you toy with it before it properly dries, but most photo paper will hold the ink really well. Sadly, because it’s not as durable as laser printing, writing–and especially erasing–on your prop can also smear the ink. Consider using something like a paperclip to track progress on a side callout box as an example.
I’m a sucker for good props. Share your tips on using your photo printer with us below!




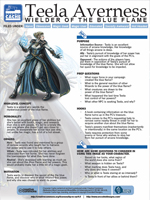
I use 4×6 cards all the time printed on a photo printer. I have good luck using standard blank Avery 4×6 cards instead of photo paper. For the black and white templates I use much like in your screenshots above, it works great and takes a pencil or pen well without smudging.
I’ve been using 3 1/2 x 5 cards for quite some time. I started off with that size because it’s index card size so it’s easy to find accessories like card boxes to accommodate it.
Our primary use is initiative cards. There’s a card for each PC, NPC, and monster. We sort them in initiative order at the start of each combat and cycle through them. With the physical cards on a stand in front of us, we always know whose turn it is and can peek to see who’s up next.
We started off simple to get buy-in. We wrote each character’s name or monster’s species by hand with a marker. The more artistic amongst us embellished the cards a little by lettering in a style or adding a small sketch.
Once everyone agreed they liked the initiative system we upped the stakes by doing cards on the computer. We combined clip art, drawings, scans, and photographs with scads of different fonts so that each card really conveyed the feel of the PC or monster it represented.
Next we created cards for spells and other effects in combat. When spells have a short duration we mix them in to the initiative deck. Each time the spell card comes up, we tick off another round of duration. These cards also have pertinent mechanics printed on them, so we don’t have to keep flipping back to the page in the rulebook that explains what the partial effects are when you save, etc.
All together these cards have made such an improvement to combats in our long term game that I can’t imagine playing even a one-shot game without them. And that’s why I mentioned above how we started with handwritten index cards. You can always pull out a dozen or so blank cards, hand write some critical information on them, and get going with them in a matter of minutes.
Hey Blackjack! So you’re printing cards now? Did you upgrade to 4×6 cards for printing, or how do you print your 3×5 cards? (My printer can’t print cards that small unless I print letter size paper and cut it up).
Yes, I’ve stayed with the 3×5 format because it fits index card holders and because we keep a pile of index cards for last minute additions to the game.
I print 3×5 images on letter size paper, up to 3 cards per page, and cut them down to size with a paper cutter. The cutter is an inexpensive but useful device I bought 12 years ago when digital photography meant take a picture + print it out + cut it to fit.
For paper I use matte card stock. It is rugged enough to last for years of weekly use, and the matte finish allows it takes pencil marking well.